

How To Install Lifeproof Flooring In A Bathroom
Vinyl plank flooring bathroom installs are a hot new trend. The vinyl floor designs have come a long way and it tin can look similar wood or even large format ceramic tile. And vinyl plank flooring is easy to install and goes in fast.
But should yous put vinyl plank floor in a bathroom? There are a few things to consider earlier you take the plunge. I swapped out my ceramic tile floor for vinyl plank floor and learned a lot forth the way. I'll aid you lot effigy out if this flooring is right for your bathroom and prove you how to do it yourself.
I installed Lifeproof Vinyl Plank Flooring, which is a luxury vinyl plank floor. If y'all're planning to utilise a peel and stick or glue down vinyl flooring both of those products are installed differently.
This post is sponsored by The Dwelling Depot.
Before we get started, make sure to follow me on YouTube, Facebook and Instagram to go on upward with all my latest builds!
Hither is what you'll need for the project:
Affiliate links are used on this page. Run into my disclosure page for info on affiliate programs.
Does Your Bath Include a Shower or Bathtub?
This is the first question to consider because a half bath (just a sink and a toilet) has a lot less h2o to exist worried about. There are still steps you lot'll need to take to protect against water issues. Only overall this is an easier bathroom to tackle.
Accept a full bathroom? So did I, and I nevertheless installed vinyl plank flooring around the toilet and bathtub using a few steps I'll show y'all.
Is There a Way To Waterproof Vinyl Plank Flooring?
Luxury vinyl plank floor is a waterproof surface, merely it's also a floating floor. This means it needs expansion cracks along the walls which are then covered up by trim. In a room without a water source, that'southward not a large deal but in a bathroom information technology's a major factor to consider.
Existing Canvas Laminate Flooring
If you already have sheet laminate in your bath you should be in good shape. Y'all tin lay your vinyl plank floor right on height of it. Just brand sure information technology's apartment and not peeling upwardly anywhere. You lot'll nonetheless want to add together 100% silicone caulk in front of the bathtub which I go into adjacent.
Existing Ceramic Tile Flooring
Just what if you take a ceramic tile floor like I did? Y'all'll need to remove the tiles, underlayment, level the subfloor and and then lay your vinyl plank floor. I go through this whole process beneath so keep reading; you can also bank check out my video tutorial.
Then you'll put down a bead of 100% silicone forth your bathtub before laying the vinyl plank flooring. Afterwards the flooring is installed you'll add another bead of silicone between the flooring and the tub to make this area waterproof.
The manufacturer'southward instructions for my vinyl plank flooring said to leave the other three walls silicone-complimentary to allow for expansion. I'll talk more most this below.
Will Yous Need to Lower Your Toilet Flange?
First of all, what is a toilet flange? A toilet flange is the part that secures the toilet to the floor and is connected to the drain pipe. The flange should exist affluent to the surface of the floor, or slightly proud. If your toilet flange is likewise high though, y'all tin can get a rocking toilet and leaks.
If yous get from a ceramic tile floor to vinyl plank flooring (similar I did), the elevation of your flooring will most likely be lower. I saw this showtime-manus after I removed the ceramic tile and underlayment. I planned to add a plywood underlayment to my subfloor and then add my luxury vinyl plank floor. The problem was my toilet flange was about ½" higher than I needed it to exist.
I lowered my toilet flange on my own, but I'd recommend having a plumber do this for y'all because it'southward not a small job. Another option would be to build up the floor with a thicker underlayment.
Footstep one: Removing Existing Flooring
Remove Toilet
I started the demo past taking out my toilet. I also removed the mirror and vanity from my bathroom because nosotros're planning to remodel the whole room. I'll be edifice a new vanity for the remodel, just If you're keeping your vanity then there's no need to remove it for this install.
Remove Trim
I'll also be upgrading the baseboards to a taller version, and so I went ahead and pulled out all the trim as well for a make clean slate. You can keep your trim in place and only remove the shoe molding if you adopt.
Next I plugged upwards the air vents with some towels so dust and debris won't land in there.
Remove Ceramic Tile Floor
At this point y'all should be ready to remove your ceramic tile flooring. Remember, if yous have sail laminate and your floor is level, y'all don't take to remove the laminate. That means you lot tin can skip steps 1 and ii.
My flooring was installed on top of an OSB subfloor. I used a combination of a small pry bar and a large demo bar to get between the subfloor and orange underlayment. Using these tools I was able to pry up the ceramic tiles and all of the underlayment.
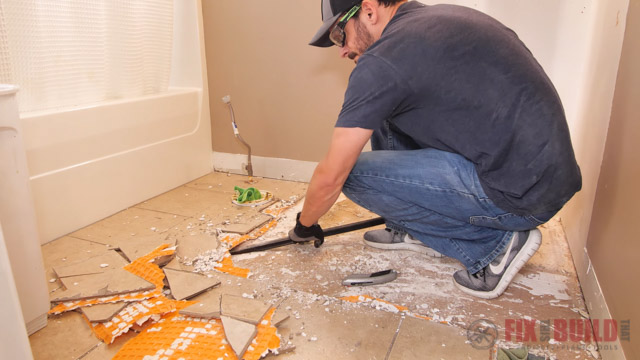 When you become nigh the toilet flange, slow downward and take your time. The last thing you want to do is bust up your flange or worse yet snap your water supply line. Same goes for around the tub. You don't want to impairment the tub by slamming into it with a pry bar.
In one case I had all of the flooring removed I vacuumed upwardly the droppings to see what I was left with.
Step ii: Prep Subfloor
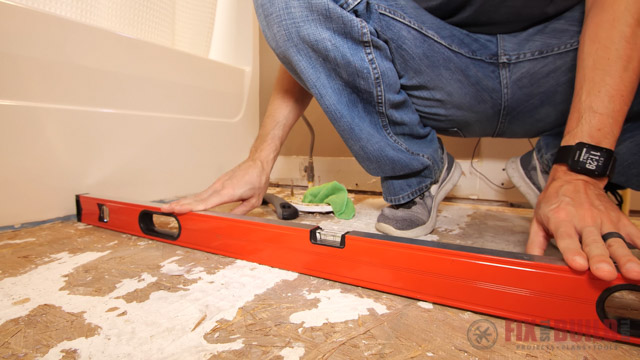
Check Floor For Level
Now that the subfloor was articulate I checked to make sure it was in good condition. So I checked it for level, and I found at that place was a hump on the seam in the subfloor.
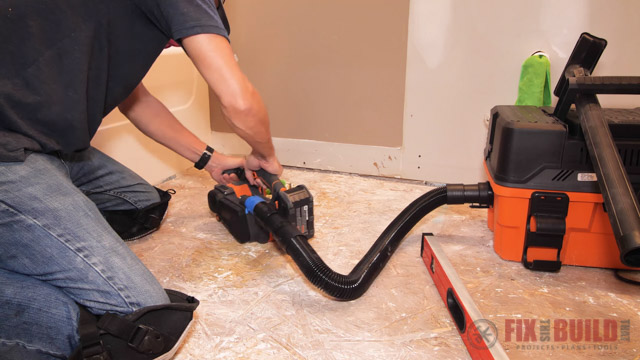
Remove Mastic
I needed to get all of the mastic off of my subfloor and then started by using a scraper. After scraping the subfloor I switched to using a belt sander which worked really well.
Fix Floor Seams and Cheque Nails
Next I vacuumed up all the mastic and checked to see if the floors were level. Unfortunately the seams were notwithstanding proud, which is a pretty common occurrence with wood subfloors.
I took the belt sander to the seams to level them out the all-time I could. I check them frequently with my level until they were flat.
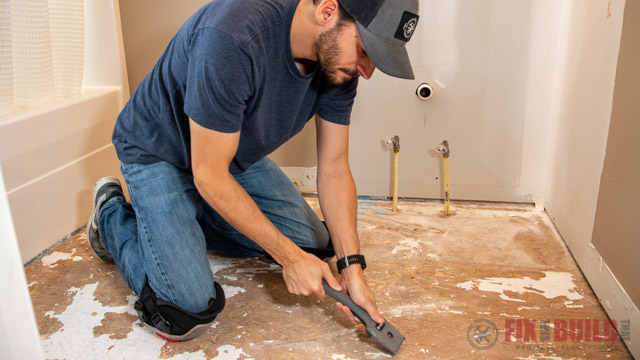
Finally I felt effectually and found whatever nails that were sticking up. And so I hammered those beneath the surface with a nailset.
There was a lot of scraping and sanding in this project and my knee pads were a lifesaver. I used the Husky Gel Soft Cap Structure Articulatio genus Pads and they were just what I needed.
I got these as office of the Home Depot ProSpective plan and they worked awesome. They have a 3-point buckle arrangement for piece of cake adjustments and so they fit nigh anybody. And they are comfy with a gel inner core and a not-marring prophylactic cap.
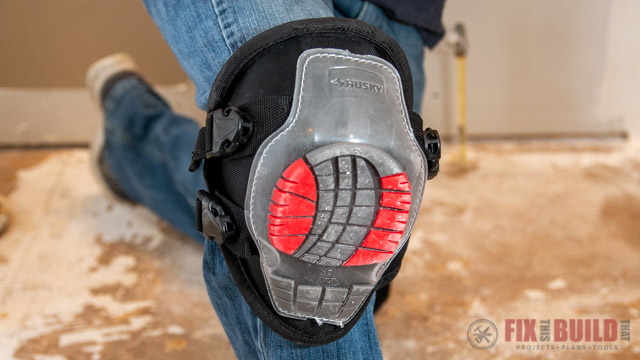 Make sure you have a pair of knee pads earlier you kickoff this, or whatsoever other floor project, you can give thanks me later.
Footstep iii: Lower Toilet Flange and Add Underlayment
Lower Toilet Flange
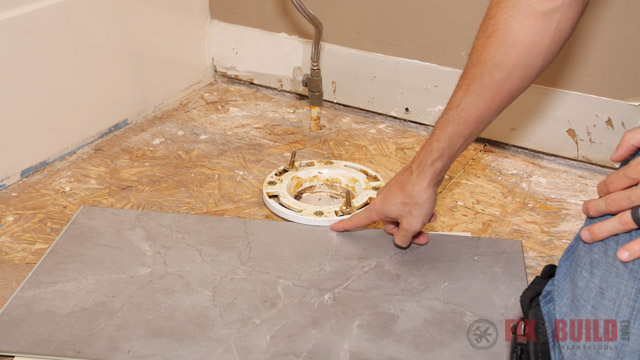
At this bespeak y'all'll demand to decide if your toilet flange needs to be lowered. The easiest manner to practice this is to lay a piece of your vinyl plank floor and any underlayment you'll be using, next to your toilet flange. Compare the height of your new flooring to the pinnacle of your current toilet flange. You lot want to toilet flange to be affluent to the flooring, or slightly proud. If your toilet flange is too high I recommend calling a plumber to lower the flange for you lot.
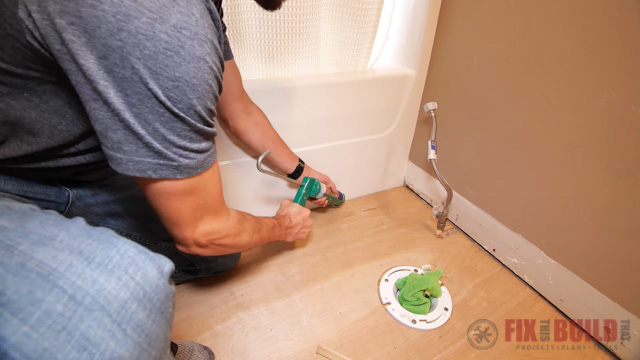
Add Silicone Caulk Along Bathtub
Before I added the plywood to my subfloor, I cleaned upwards the side of the bathtub. Then I laid down a new bead of silicone caulk to stop any h2o from getting under the tub.
Add Plywood to Subfloor
I decided to add together 5mm plywood to my OSB subfloor. This was an optional stride, but I wanted to take a smooth surface to work with when I installed the vinyl plank floor. It too helped enhance the flooring up to the level of the toilet flange.
The plywood gets secured to the ground with staples….a lot of staples. After securing one corner I came across the sheet diagonally. This helps get good contact in the center of the canvas and then you tin can work your way outward to avoid humps.
Add More Silicone Caulk In Front end of Bathtub
I used an ⅛" spacer betwixt the plywood and tub and removed information technology and filled that gap with more silicone caulk after I was done.
I as well went back and set whatever staples below the surface that didn't get sunk all the manner.
Step 4: Layout and Install First Row of Tiles
The vinyl plank flooring I'grand using is fabricated to wait like large format ceramic tiles, complete with fake grout lines. Each tile has a barrier congenital in for sound dampening and you don't need a roll out underlayment because it'south already built-in.
Plan Your Layout
You can layout your tiles in the room and take measurements to calculate offsets and minimize minor pieces during install. But I prefer a more than tech savvy arroyo. I used Sketchup to draw the room to verbal dimensions and added tiles in a brick pattern.
I saw 5 rows would fit most perfectly. And so I put dimensions on the showtime and last tile of a row and moved the entire floor to get an even match at the start and end.
And if y'all want to go a stride farther, which of course I did, you can add in the pipes and vents to plan around them every bit well.

Adjust Tiles to Straight Reference Line
Installing the first row tin be tricky if your wall isn't straight. I snapped a chalk line at a right angle to the tub 5" off the wall using a carpenter'southward square as reference.
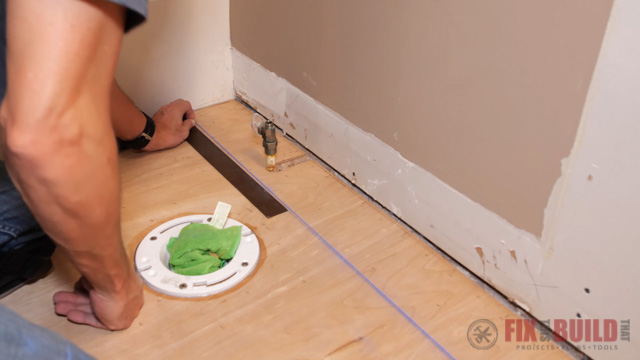
Using that line I could run across the wall tapered out ½" at the far finish and I marked other points along the way.
I cut the first tile to length using my layout cartoon. I'thou using a tile cutter for a clean border, just y'all can cut this many other ways like I outlined in my half dozen ways to cut vinyl flooring video.
Then I could use the points I measured to make the taper or scribe on the plank. Since the far side was ½" out, I had to take ½" off the commencement board to allow for a total plank at the far stop.
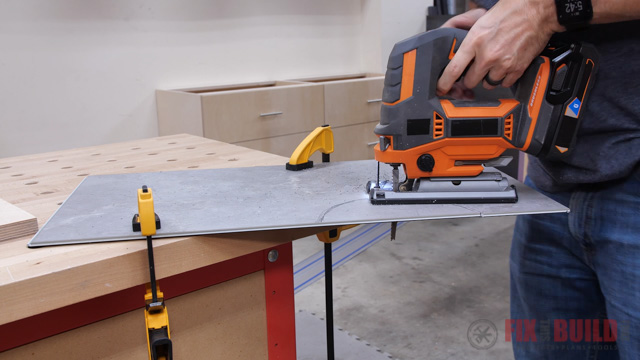
I made the cut with my jigsaw.
And so I brought the piece back to the bathroom to cut a hole for the h2o supply.
Make sure to factor in the ¼" expansion gap when you lot have these measurements. I used scraps of the underlayment taped to the wall as spacers.
Drill Holes For Water Lines and Toilet Flange
I drilled the spot for the h2o supply line using a spade bit. Then I turned off my h2o and took off the shut off valve to slip the slice over the pipage.
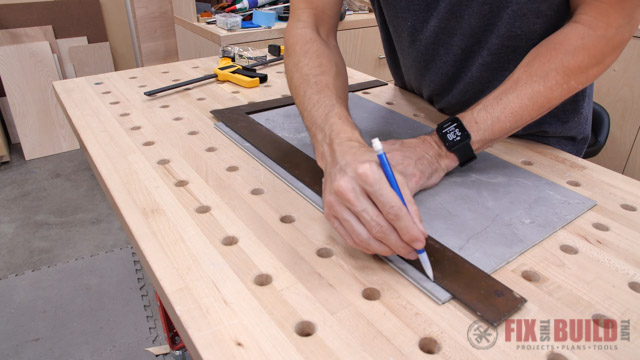
I'd bought an extra toilet flange and it turned out to exist the perfect reference to trace for the cut out.
I went back to my shop and cut the curve out with a jigsaw. The jigsaw is definitely the almost versatile cutting tool for vinyl flooring installs.
The piece fit in perfectly, and yous'll notice I put another ⅛" spacer against the tub since I'll be caulking that seam at the end.
This might seem like a lot of piece of work upwardly front, but getting the beginning row correct is super important and sets the stage for the rest of the install.
I repeated these same steps for the side by side two tiles in the first row. The 2d piece needed a slightly offset taper as the wall had a crash-land out from a stud on it. And after the taper I cutting a hole for the hot water pipe.
For the last piece I cut information technology to length and then put a small taper on the forepart terminate leaving the back end at full width.
Step five: Install and Tap Floor Into Identify
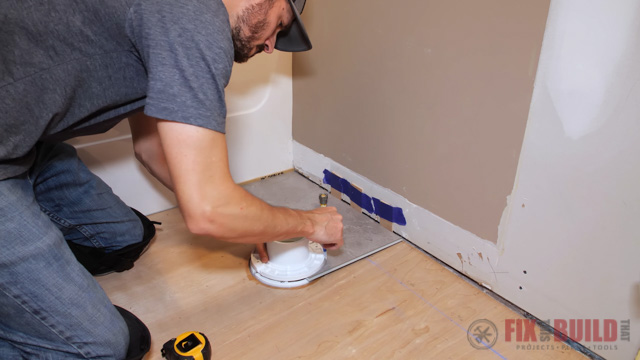
Install Vinyl Plank Flooring Around Toilet Flange
Next I cut a small tile that would hit exactly in the center of the tile in the first row. Then I put information technology in identify. Later on that I used a full size piece to get the other half of the notch for the toilet flange.
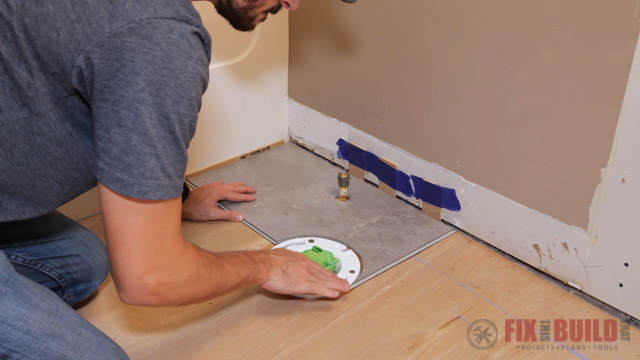
I went to the store and cut the curve out once more with the jigsaw and was ready to get-go locking things in place.
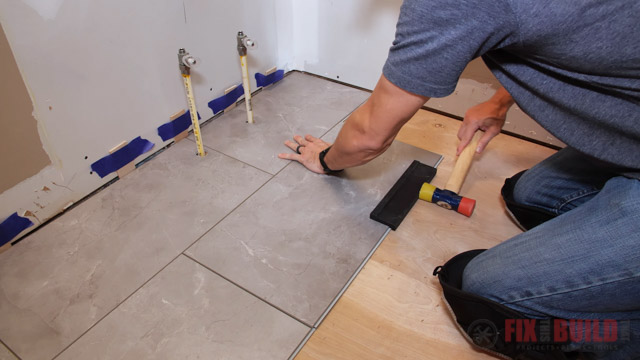
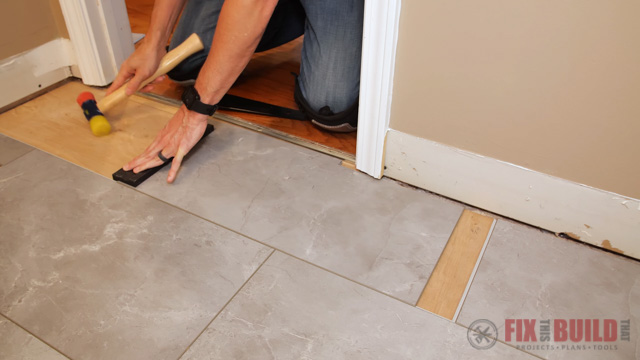
Tap 2nd Row of Flooring Into Identify
You may have noticed that I didn't tap the first row of vinyl plank flooring into place. That'due south because I wanted to wait until I had tiles for the second row laid down. At present I'm set to starting time tapping them into place using a soft mallet and a tapping block. I'll besides be using a cheater's bar when I get to the end of the rows.
I tapped the seams together with the mallet locking them in identify. Then I could push the 2nd row firmly into the 1st row with the tapping block.
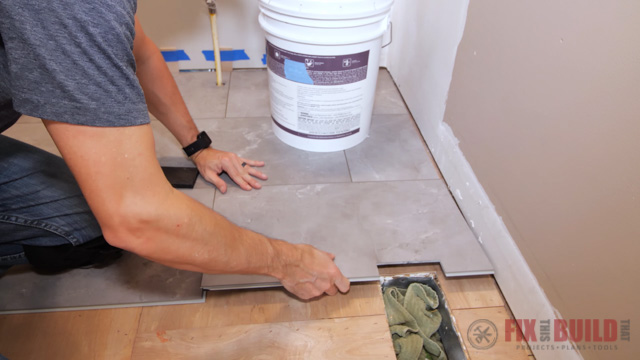
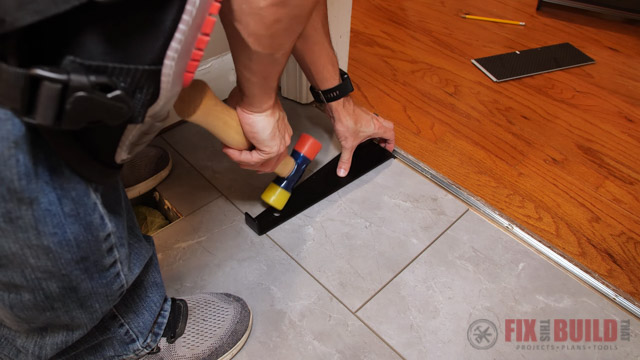
 For the final piece in the row I pulled out the pull bar or cheater bar. It lets you lot become over the end of the tile and pull it tight into the rest of the row.

Install the Field of Vinyl Tiles
I connected down the third row securing the tiles into the previous row first and tapping them tight, so locking in the short side. The last piece in the 3rd row hitting the air vent in the room. Since I could lay the tile in identify right over the vent it was easy to marking for the width of the cutting.
And so I just measured how far up to make the opening and drew information technology on the tile. Then I used my jigsaw to make the cut.
It fit in perfectly and I moved on to the fourth row.
I worked my manner down the 4th row of tiles without an issue until I reached the air vent. When I planned the layout I made sure to have a full tile terminate right at the air vent. This makes the cuts a lot cleaner and gives the tiles more support.
Install Last Row of Vinyl Plank Flooring
The last row needs to become cut to width and scribed but like the first row. Yous want to leave a ¼" gap at the wall for an expansion joint as well. I cut the piece to length then measured for the scribing cuts. After a quick cut on the jigsaw it was a good fit.
Yous'll have to use the cheater bar on this terminal row to pull it tight to the other rows just similar we've done on the ends of each row.
Stride 6: Install Transition Piece, Trim and Silicone
I knew I wouldn't be able to knife the last two tiles into position considering of the location of my doorway in relation to the tiles. 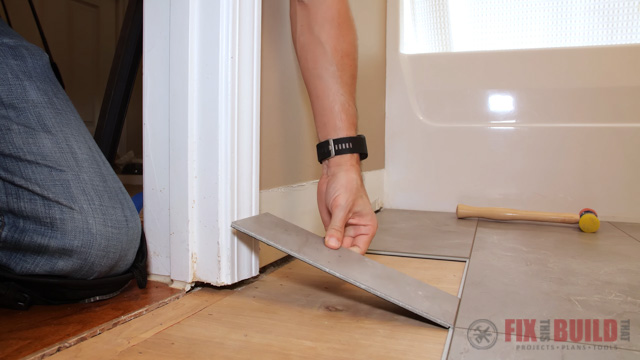
That meant I would have to install the metal c-channel for my transition strip kickoff. Then I could taper the tiles and install the concluding two pieces in front of my doorway.
Install C-Channel Strip
I have a 28" door going into the bathroom and the transition strip I'm using is a t-mold that is sold in 72" lengths. It's has two parts, the metallic c-channel that gets fastened to the floor, and so the t-molding that snaps into it.
I measured a length ½" smaller than the door opening and cut downwards the c-aqueduct with some tin snips. You can also apply a hacksaw to cut this. When you're positioning the transition yous want to think almost where it'south going to hitting and if information technology will show or not when the door is closed.
My hardwood stops right where the face of the door volition be sitting so I positioned the c-channel so the transition would but sit down on top of the hardwood. I secured it with the included screws and now I could have the measurements to scribe in my last two pieces.
Install Vinyl Plank Flooring Around Door Trim
The pieces will have a picayune stride cut in them where the door opening sticks out further than the wall. And afterward a quick trip to the store with the jigsaw I had the piece cut to fit.
So I decided to loosely lock in the tongue and groove lip on the long border of the tile. This would allow me to employ the tapping cake to scoot the tile under the trim. I did this until the tile was in identify.
You may need to lift up on the cease of the tile a little to get it to lock in, but after some mallet piece of work it fit in like a champ.
I took the measurements on the terminal piece and cut it to size in the shop. I tried the aforementioned trick on the final tile, but since I didn't take open space to the left I couldn't really lock in the whole long edge. But after a scrap of maneuvering I was able to get it all locked in.
Attach Transition Slice
I went ahead and cut the transition to cease off this expanse. Using my miter saw gave me some scrap out then I went the old fashion route with a mitt saw and it worked great.
The transition pops right into the c-channel and since my door jambs were nether cut for a taller floor I was able to slide the transition correct under them for a clean look.
This is not the correct transition for my flooring. I had to special social club one which will lucifer the flooring much better and it'll be here soon.
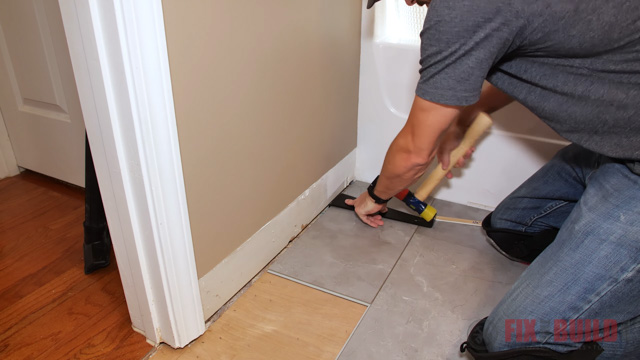
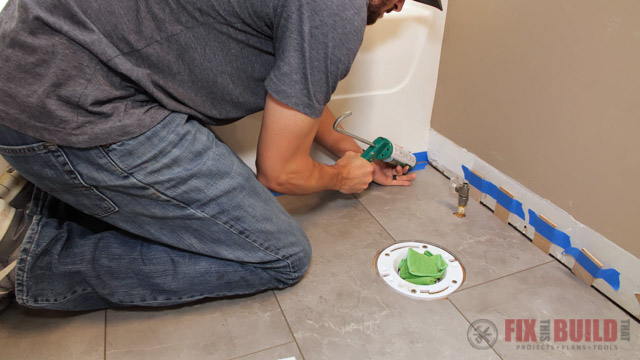
Add Silicone Caulk and Attach Trim
Installing the vinyl plank floor against the tub is an important function. I left an ⅛" gap between the tub and tiles so I could make full it with silicone caulk. We found some grout colored silicone that matched pretty well and looks much better than white or articulate.
I put the taller baseboards in to finish the install and it was looking really groovy.
And that's how I installed vinyl plank flooring in a bathroom! This big tile style vinyl plank flooring came out looking style amend than I idea it would honestly. If yous liked this project check out how I installed vinyl plank flooring in my laundry room.
The Home Depot provided me with production and/or monetary compensation as a sponsor of this build. All opinions are my own and are non filtered by the sponsor.

Source: https://fixthisbuildthat.com/vinyl-plank-flooring-bathroom-install-how-to/
Posted by: wilcoxuntio1958.blogspot.com
0 Response to "How To Install Lifeproof Flooring In A Bathroom"
Post a Comment